TOSHIBA e-STUDIO series multifunctional digital system
The Toshiba e-STUDIO series multifunctional digital system covers four product series (5005AC/5008A/7506AC/8508A), with the core highlight of supporting A3-LT full-size paper, 60-300g/m ² multimedia adaptation, and integrated copying/printing/scanning functions. The continuous copying speed is 20-85 pages/minute, suitable for various media such as ordinary paper, thick paper, envelopes, transparent film, etc. It supports 12 binding modes such as binding, punching, folding, etc., and is equipped with a wide range of optional accessories such as RADF/DSDF document feeder and large capacity paper box. It has a built-in PCL/PS dual font library, which is widely used in office and industrial document processing scenarios.
1、 Product series and positioning
1.1 Product Series Division
The product series includes core positioning dimensions and types of models
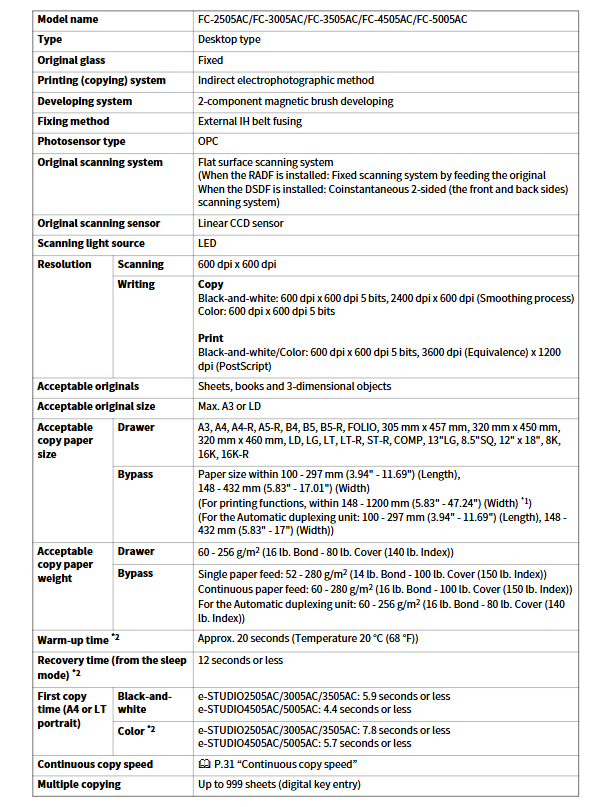
E-STUDIO5005AC 2000AC/2500AC/2505AC-5005AC Mid end Office (Color+Black and White) Desktop Type
E-STUDIO5008A 2008A-5008A Mid end Office (Black and White Main) Desktop Type
E-STUDIO7506AC 5506AC/6506AC/7506AC high-end office (high-speed color) floor standing model
E-STUDIO8508A 5508-8508A high-end office (high-speed black and white) floor standing model
1.2 Core Function Positioning
Basic functions: copying, printing, scanning (standard across the entire series)
Additional features: fax (optional), network printing, USB data export
Featured features: Multi media adaptation, automatic double-sided processing, template storage (up to 1000 sheets/group)
2、 Detailed explanation of core specifications
2.1 Paper adaptation specifications (universal core parameters for the entire series)
Specific parameter notes for adaptation dimensions
Size range standard sizes: A3/A4/A4-R/A5-R/B4/B5/LT/LD, etc
Non standard size: 100-297mm (length) × 148-1200mm (width) Printing support up to 1200mm
Media types: regular paper, recycled paper, thick paper (81-256g/m ²), ultra thick paper (257-300g/m ²), envelope, transparent film, waterproof paper, label paper. Envelopes do not support double-sided printing
Weight range: Paper box: 60-256g/m ²
Bypass paper feeding: 52-300g/m ², slightly different models
Recommended medium for regular paper: 80g/m ² (Toshiba TGIS/Mondi)
Thick paper: 90-120g/m ² (Color Copy series) requires the use of Toshiba recommended media to avoid malfunctions
2.2 Performance Core Parameters (Series Comparison)
Performance indicators e-STUDIO5005AC e-STUDIO5008A e-STUDIO7506AC e-STUDIO8508A
Continuous copying speed (A4/B&W) 20-50 pages/minute 20-50 pages/minute 55-75 pages/minute 55-85 pages/minute
Preheating time (20 ℃) 20 seconds 20 seconds 20 seconds 20-24 seconds
First copy time (A4) 4.4-9.5 seconds 3.6-4.3 seconds 4.1-6.4 seconds 4.1-5.2 seconds
Maximum continuous copy quantity 999 sheets 999 sheets 9999 sheets 9999 sheets
Maximum memory capacity of 1000 equivalent maximum 1000 equivalent maximum 1000 equivalent maximum 1000 equivalent maximum 1000 equivalent maximum 1000 equivalent
2.3 Resolution and Image Quality
Scanning resolution: 600dpi × 600dpi (fixed)
Printing resolution:
Black and White: 600dpi x 600dpi (5-digit), 2400dpi (equivalent) x 600dpi
Color: 600dpi x 600dpi (5-digit), 3600dpi (equivalent) x 1200dpi (PostScript)
Image processing: edge enhancement, smoothing, automatic density adjustment
3、 Optional accessories and extended functions
3.1 Four major categories of core accessories
Accessory category represents model core function adaptation series
Document input RADF (MR-3031) 100 page single and double-sided automatic feeding full series
DSDF (MR-4000) 300 pages high-speed double-sided scanning (120 pages/minute) 5005AC/5008A/8508A
Paper supply large capacity paper box (KD-1059) 2000 sheets A4/LT compatible with 5005AC/5008A
External large capacity feeder (MP-2502A/L) 2500 A4/LT compatible with 7506AC/8508A
Envelope drawer (MY-1049) for storing 60 envelopes in the entire series
Binding output ordinary stapler (MJ-1109) corner binding, sorting, grouping 5005AC/5008A
Horseback Nail Binding Machine (MJ-1112) Folding+Horseback Nail Binding (15 pages/set) 7506AC/8508A
Punching unit (MJ-6106) 2/3/4 hole punching (hole diameter 6.0-8.0mm) full series
System Extended Fax Unit (GD-1370) Super G3 Fax (33.6Kbps) Full Series
Wireless LAN Module (GN-4020) IEEE 802.11b/g/n+Bluetooth V3.0 Full Series
3.2 12 binding modes (core mode)
Binding Mode Function Description Required Accessories
Sort: Offset output in page number order using a regular stapler
Group by Set Offset Output Common Binding Tool
Staple Sort Single/Double Corner Binding (50 pages/set) Regular Binding Machine
Saddle Stitch Mid seam Folding+Binding (15 pages/set) Saddle Stitch Binding Machine
Center Fold Unbound Center Fold Horseback Nail Binding Device
Hole Punch 2/3/4 hole punching (adjustable spacing) punching unit
4、 Software and font support
4.1 Built in font library
PCL fonts: 79 types (including Courier, Arial, Times New Roman, etc.)
PS font: including Adobe standard fonts (Helvetica, Times, etc.)
Extended fonts: Supports Unicode font packs (optional)
4.2 Template and Storage
Template grouping: 1 public group+200 private groups
Number of templates per group: 60 per group
Storage method: HDD built-in storage (1GB fax memory)
5、 Environmental and safety regulations
5.1 Operating Environment
Temperature: 10-30 ℃ (normal use)
Humidity: 20-85% (no condensation)
Power supply: AC 120V/220-240V (± 10%), 50/60Hz
5.2 Safety and Compliance
Certification: CE/UL/CSA Security Certification
Protection: Overheating protection, overload protection, electrostatic protection
Disposal: Burning is prohibited and local environmental regulations must be followed